Der Schwager hatte noch ein altes, simples “NAS” in der Schublade und es wäre doch höchst schmählich, dieses nicht noch einer Verwendung zuzuführen. Doch leider ist die Firmware massiv veraltet, voller Sicherheitslücken und wurde mehrfach Opfer von Angriffen inklusive Datenverlust.
Welch Glück, dass die openWRT-Community das Gerät mit seinem Netzwerkbetriebssystem gangbar machen kann, sodass es als SAMBA-Server weiterhin seinen Dienst verrichten kann. Doch ist der Weg dort hin etwas steinig und Anleitungen sind nicht unbedingt up to date. Daher habe ich mir ein Tutorial angesehen, es Schritt für Schritt angewendet und Änderungen gen Verfasser gemailt, wobei der Inhalt hier noch gepostet sein soll.
Edit: Auch dieser Ansatz auf Deutsch ist ganz gut dokumentiert, wobei ich jedoch genau wie weiter unten zunächst am IPv4-Zugang im Netzwerk gescheitert bin.
Cheers mate,
I struggled with configuring my WD MBL single with openWRT and found your guide on how to do it successfully. Thank you very much for the effort you put into it!
If you are still interested in having this document up to date I’ld like to leave some thoughts:
1) Step 23 has not been available for me. I think this tab is outdated. Still I had to change the entire IPv6 stuff to not available because the device simply weren’t accessible via IPv4 leaving it turned on.
2) Step 38 needs to be updated as we are currently running samba4-server, samba4-client and luci-app-samba4.
3) The fdisk procedure did not work for me with the default entries due to the recent switch of the openWRT table layout. What is important is to write down the last used sectors of /dev/sda2 and use n+1 as the leading sector of /dev/sda3. Otherwise default limits the partition size to 3 MB in total. So for me (default 2TB WD green drive) I had to start at 274560 and could use the default entry for the last sector.
4) Step 51 has not been reproducible for me, can be left out.
5) Step 56: Dunno why you use the time command as it has no direct use other than verbosing.
6) Step 77: I’ld prefer to have step 83 before this one.
Finally, I have this simple NAS up and running due to your help. Again, thank you very much for the assistance.
Best,
Simon
Die Anleitung selbst findet sich bei Google-Drive. Sicherheitshalber speichere ich sie hier im Fließtext mit ein. Kudos dem Autor:
This is a text version of this how-to video, for updating to the OpenWRT firmware on a WD My Book Live NAS, replacing the old WD firmware that is no longer supported. The procedure and all files are shared on the OpenWRT website.
I decided to do this as the video misses a couple of steps that are important, and I will use this again in the future so it will act as a quick reference, rather than needing to open the video and click through it. Sharing for others that might find it useful. Also, this method cuts out some of the work done in the Terminal, so is a bit easier for a new Ubuntu/Linux user assuming they have used Windows in the past.
Good luck with it!
MBL = MyBookLive
DG = Default Gateway
Before you start, you will need a working installation of Ubuntu desktop, on a system with available SATA and power connections to attach the MBL hard drive to the PC directly, be sure to check this before installing anything. Ubuntu is free and can be installed alongside Windows without too much effort. Google “dual booting Windows10 and Ubuntu” for more information.
- If you have any data/files that you do not want to lose on the MBL, now is the time to back it up onto another drive/pc. All data will be lost from the hard drive if you follow these instructions.
- If you have space on a hard drive on your Ubuntu machine, you can remove the drive from the MBL enclosure and back up your data/files to the Ubuntu machine hard drive after installing the drive into the ubuntu machine.
- Once you complete your backup, remove the hard drive from the Mybook enclosure if you have not already. See this vid for more details on removing the drive.
- Once removed, connect the hard drive to a PC running Ubuntu, or other Linux distros via an internal SATA or eSATA connection. Once connected, boot the ubuntu machine and open up the Disks application. You should see the drive listed in your list of drives, with the factory partitions and data.
- Download the files required, you will need the factory image first, or that is what worked for me at least available on the OpenWRT website.
- Extract/Un-Tar the downloaded file (in the Files app, double click on the downloaded file) to a location you will remember like in the downloads folder.
- Right click on the .img file, and choose “open with another program” and select “Ubuntu Image Writer”.
- Then select the hard drive you want to write the image too in the drop down box. Be careful not to write it to one of your system drives. Double check the drive name by going back to the main screen of the Drives app.
- Once you select your drive, and press write, it will take a few moments, and then you should see the drive with multiple partitions in the Disks app. They should be small, 256 mb’s or less.
- Now shutdown the PC and remove the hard drive, return it back to the Mybook enclosure. (At this point I left mine out of the enclosure, and just connected the control board to the hard drive to allow me to boot the unit, and verify the openwrt firmware was loaded properly)
- Once reinstalled, power the unit back up and connect it to your PC directly via your network port, using a network cable.
- Once the unit fully boots you will see the LED on the MBL blinks green 2 or 3 times, and then stay Green like normal, you should also see your network connect to the built-in DHCP server and it should give your PC an IP address in the 192.168.1.xxx range. (Your PC network connection should be set to DHCP, or you can set it to 192.168.1.2 if you prefer)
- Once the connection is established, you can open any web browser and enter the new default IP address of the MBL, which will be 192.168.1.1.
- You should now see the login screen for the LOCI interface.
- Login in with:
- user : root
- No password.
- Once logged in, go to the System>>Administration tab, and set a strong password.
- Once your password is set, open the Network Interfaces tab.
- You should see the default LAN interface the firmware creates. Click on the Edit button.
- Change the IP address to one that will work within your own network, in my case I have the same scheme as the default dchp provided, so I only needed to change the last octave from 1 to 200. So my new IP would be 192.168.1.200. Subnet mask is 255.255.255.0
- Set the Default Gateway address to that of your internal router or isp router, whichever you are using.
- Set the DNS host address to your internal router or whatever DNS service you prefer.
- Leave the rest of the options blank, or as the default, and click save.
- Now, navigate to the DHCP Server tab, and select “Ignore Interface”, assuming you will not want to use the DCHP server on the MBL. Click Save and let it do its thing.
- Once that window closes you should be back at the interfaces tab, click on the “Save and Apply” button.
- The unit will apply the settings and then give you an alert that you need to apply settings, or revert settings. Click apply anyways or whatever it says.
- Now you will get an error that you can no longer connect to the web interface at address 192.168.1.1.
- At this point, unplug the unit, and return the hard drive and control board back into its enclosure if you have not already, and then connect it back up to your network instead of your PC with the LAN port, and power the unit back on.
- The MBL will reboot, once it does you will need to navigate to the new IP address you set in the previous step.
- You should be able to log in with the password you set, and resume setting up the unit.
- Once you are logged into the web interface at the new address, you will want to connect to the unit using an SSH connection. ( The following steps can be done within the Systems>>Software menu for adding all the apps, but I found it easier to run the commands in SSH, as its only a few)
- Before connecting, you can set up a public/private key using Putty or your choice of programs that can generate keys.
- Navigate to the System menu, then Administration section, then the SSH Keys tab, here you can enter the public key you generate, and use it to connect for a more secure SSH connection.
- Now open the SSH Access tab, and enable SSH. and change any other information you want to change. Hit save and apply.
- Open an SSH connection, and log in to the unit with your key or you can always use the root password you set, but remember it is less secure than using a key and a key phrase.
- The next steps using SSH can be done through the System >> Software menu instead if you prefer, but since I have written out the commands, you can copy and paste them easily into the terminal.
- Once logged in via ssh, run an update by entering the command :
opkg update
- A new list of available packages will be downloaded.
- Once that is complete, install SAMBA server and its client, and its luci app with the command :
opkg install samba36-server samba36-client luci-app-samba
- The samba packages will download and install.
- Next you will want to install FDISK so you will be able to create partitions for you network shares, as well as the apps that are needed, for ext4, e2fs, and hd-idle (power/drive saver app). Type the command :
opkg install fdisk kmod-fs-ext4 e2fsprogs hd-idle luci-app-hd-idle
- FDISK will download and install, once complete, you can run the command :
fdisk -l
- You should see a list of only 2 active partitions : \dev\sda1 and \dev\sad2, so now we want to create the storage partition to use for our shares. Enter the command :
fdisk /dev/sda
- This will open FDISK and allow you to create the partitions.
- Enter “m” (small m) for help, to see a list of all the commands.
- First you want to create a new partition, so enter “n” at the prompt.
- It will ask you which partition type you would like, enter “p” for primary.
- Then it will ask which number you would like the partition to be, I selected 3.
- Then it will ask for the first sector, I used the default and hit enter.
- Then it will ask you for the last sector, again you can use the default to make it the full available size of what remains of the drives space not being used by the Openwrt firmware. My first unit I did was a 2 TB, the second on .5TB and it worked the same using the default settings.
- Once that is complete it should say it has created a new partition, and ask you if you want to “remove the signature”, I entered Y, for Yes.
- Now you want to Write the new partition information to the partition table, so you need to enter “w” at the prompt.
- Once that is done you will see a message stating the Partition table has been altered, and also a “syncing disks” message.
- At this point (at 3:51 in the walk though, is the reason I decided to do this write up lol, as the instructions are off the screen, as well, the person doing the setup already had the unit functioning, so did not need to do the reboot yet) return to the web interface, and reboot the unit in the System>>Reboot menu.
- Once rebooted, reconnect via the web interface, as well as an SSH connection.
- Special thanks goes to mwav3 for sharing the command he provided in the original video comments.
- At the SSH prompt, enter the command :
time mkfs.ext4 -L Data /dev/sda3
- Now run “fdisk -l” again, and you should see the new partition sda3.
- Now we want to install BLKID, which will display the UUID of the 3 partitions. Enter the commands :
opkg update
opkg install blkid
- Once installed, enter the command :
blkid
- It should show you a list of the 3 partitions we have created, as well as their UUID’s, which should all be similar in length, but unique. Keep this information displayed until you complete the next few steps, for easy reference.
- Now go back to the web interface, and go to the System>>Mount Points tab.
- Scroll down to the Mount Points section, and click on the Add button.
- In the window that opens, select the Enabled check box.
- Then select the UUID of sda3, it should list it in the options.
- If the UUID is not listed, you may need to restart the MBL, and run the command from step 52.
- Once restarted, reconnected, and the command from step 52 is run in your SSH terminal, repeat steps 60-63.
- Now set the mount point to “ /mnt/sda3“.
- Then navigate to the Advanced Settings tab, and make sure the Filesystem is set to “Auto”, then click Save.
- You should then be returned to the Mount Points tab, where you will now see your Partition mounted in the list of Mount Points.
- Then click Save and Apply when it appears in the next window.
- The unit will apply the settings.
- Go to Services >> Network Shares tab and create a share.
- Enter a unique hostname that you will remember, this will be what you see on your network as the device name.
- Add a description and workgroup, if you have one setup on your network.
- Then scroll down to the Share Directories section.
- Enter a unique name for your share. This will be the name after the Host name, that you will enter into windows explorer or other file explorers to find the shared folders you are creating. (e.g. \\openwrt\wifes_share1 )
- The path to your folders should be /mnt/sda3/data if you did the exact steps above, but your config can be different.
- Then select the “Browseable” check box.
- Then select the “Allow Guests” check box.
- Then press the Save and Apply button.
- The unit will apply the settings.
- At this point I needed to reboot, so System >> Reboot tab.
- Once rebooted, and reconnected via SSH, we need to create an actual folder in the new share, so enter the commands :
cd /mnt/sda3
mkdir data
chmod 777 data/
- Once that is done, you should see your share in windows explorer or whatever explorer you have, like you would have seen with the old MBL folders. The name will be the name you gave your share in the Shared Directories setup.
If you do not require a secure folder, you can stop at this point.
One thing that made the process easier for me was I created the share folders I wanted in the Web interface, unsecured for the time being, under Services > Network Shares before I started creating users and securing anything.
This way when you open the config files in the next few steps, the share info is already populated in the file, so you will just need to change a few lines.
In my config, I wanted 1 unsecured share, and one secured, so I created share1 and share2, but where I created share1 with the open settings, as I described in steps 72-80, I then made the second one Browsable but left the Allow Guest box unchecked. Also I knew what my username was going to be so I added the username at this point, in the box provided.
- Now, to secure your share with user level access (username and password required) you need to create the user account, and then set the passwords, as well as configure Samba to only allow the users specified.
- Thanks to reddit user u/funroll-loops for pointing me in the right direction. He sent me to this page on the openwrt website which explains the process. As you can see it outlines user and share level access, so you can do either way, but I will only explain the user level settings and config.
- First you need to create a new user, this is where I started to use WinSCP to connect to my MBL as you will need to edit multiple files, so a bit easier than using the terminal. To do so you need the login you use for the web interface, not the SSH login info (took me a while to figure that out lol).
- Once logged in with WinSCP, navigate to the /etc folder, and find the passwd file. /etc/passwd. Double click to open it with WinSCP Editor.
- You need to add a new line to the file :
newuser:*:1000:65534:newuser:/var:/bin/false
- newuser is the name you want to call your account, so example “wifename” will be the username, so the line would be :
wifename:*:1000:65534:wifename:/var:/bin/false
- You will also need to specify the user id, which is the first number set in the line above, so 1000 would be your wifename user id.
- Set that to anything between 1000-65000, so if you want to be id 1000, she can be 1001.
- Leave the second number set to 65534, that is the group id. This can be adjusted but I’m not sure of all the ins and outs, so you do so at your own risk.
- Once done, you can click the save button in the editor window, then close the file.
- Next you need to add a password for the account we just created, so we need to open a terminal window with Putty, and enter the command :
smbpasswd – a wifename
- You will then be prompted to input a new password, press enter when complete, then repeat the password, then enter again to complete it. You should see a message stating the password has been set or something similar.
- Next you will need to edit the Samba configuration to allow users with a password.
- Go back into WinSCP, and navigate to /etc/samba/samba.conf
- If you set up the shares in the web interface as I mentioned before, you should see them listed separately by the names you gave them.
- The only thing I needed to change is the option ‘create mask’ ‘0700’ and dir mask 0700, as seen in the picture below, I left everything else as it was auto populated:
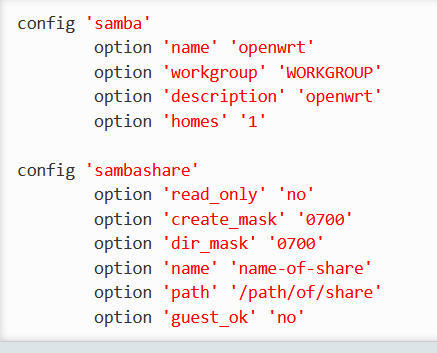
- You should also make sure the share for your secure folder has the setting option guest ok set to “no”, if it is not you have missed a step above (note between steps 84-85).
- Once done you can click save in the editor window. The config will be saved.
- Now you will need to reboot the unit, so go back to the web interface, and go to System >> Reboot.
- Let the system reboot, usually mine takes about 30 secs.
- Now, open your Windows file explorer, and navigate to the Network tab, or enter the address to your unit in the address bar, and it should open a view of your 2+ shares.
- First check your unsecured folder is available without being prompted for a password, by trying to open it.
- Then try to open your secure folder. It should ask you for a username and password.
- Enter the username and password you created.
- Now you should have an empty folder where you can create new folders and files, and move files and data to and from, while keeping it secure.
That should be it, hopefully it worked for you as it did for me. If you have any comments for feedback, or ideas to improve this please email me at ne1c4nsc4n@gmail.com. Special thanks to those who helped me out, and to everyone involved in the OpenWRT project!
Cheers!
Sources :
OpenWRT MBL Webpage : https://openwrt.org/toh/wd/mybooklive
Samba Configuration : https://openwrt.org/docs/guide-user/services/nas/samba
MBL Disassembly : https://www.youtube.com/watch?v=5DEFdA4–Xw